My strange keyboards, or an intro to minimal ergonomic mechanical keyboards
I do all my typing on a few strange keyboards. With no key legends and significantly fewer keys than any normal keyboard, they look weird. Family, friends, and total strangers in airports have inevitably asked me about them over the years. I’m usually happy to give a brief overview, but a real explanation takes time. This post is the real explanation.


My strange keyboards. On top is my Kyria, which I built from a kit, and on bottom are my two Atreuses, which I bought pre-built.
Physical attributes
Let’s start with some of the obvious talking points based on the pictures above. I have two single-piece keyboards, both Atreuses that I bought pre-built from Keyboardio, and one split keyboard, a Kyria that I bought as a kit and assembled myself.
I use only 34 keys on a regular basis. On my two single-piece keyboards, these 34 keys are all the same color, with a few extra keys that I don’t use in the opposite color around the edges. (I use the same corresponding 34 keys on my split keyboard, but it’s harder to tell because the key caps are not color-coordinated.) Normal keyboards have way more keys; even my laptop has 78. Using so few keys means that my hands don’t have to stretch to reach any keys, which is nice and comfy. I still have all the functionality of a normal keyboard’s keys, though – more on how that works later.
My keys don’t have any legends on them. The lack of labels forces me to touch type, which is generally preferred anyway. Plus unlabelled keys are convenient when customizing the keyboard layout – if I swap where the A and B keys are, I don’t have to swap the physical keys because they’re all blank anyway.
The keys are also arranged a bit differently than on a typical keyboard. My keyboards use a column-staggered layout, meaning that the keys are arranged in columns, with the keys horizontally aligned within each column. The columns are staggered relative to each other to match the different lengths of each finger. Contrast this with a normal keyboard, which aligns keys nicely within each row but then confusingly staggers the rows relative to each other.
| Q | W | E | R | T |
| A | S | D | F | G |
| Z | X | C | V | B |
| Q | W | E | R | T |
| A | S | D | F | G |
| Z | X | C | V | B |
Similarly, all the keys on my keyboards are the same size. No big modifier keys or tiny arrows, and certainly no giant space bar. Using all small keys reduces the distance between keys. It also allows for more keys in some important locations. For example, you’ll notice that each of my thumbs has access to three separate keys (on the bottom row), whereas on a typical keyboard both thumbs would be primarily dedicated to the space bar – what a waste!
In yet another departure from the norm, my keyboards are all split into two sections. The Kyria is physically split into two halves, which allows each half to be positioned where it’s most comfortable for me. The picture below shows the stand I built for it out of LEGOs. The two halves of the board are spread to about shoulder-width, and they’re tented, meaning that they tilt upward such that my index fingers are higher above the desk than my pinkies. Both of these adjustments keep my hands and arms in more natural positions while I type. The Atreuses are each just a single piece, but there are still two distinct groupings of keys, each slightly angled to reduce wrist bending.

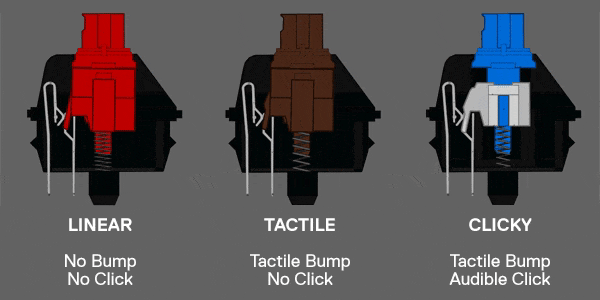
Last but not least, my keyboards use mechanical switches. Under each key cap, there is a plastic switch made of two main parts. The housing encases the stem, which slides up and down when pressed. There are small metal contacts within the switch that make contact when the switch is pressed, causing the keyboard to register a key press. A spring inside each switch pushes the stem back up after each press. Many years ago, all keyboards were built with mechanical switches, but most modern keyboards instead use alternative switch designs that are typically thinner and quieter. Keyboard enthusiasts like me often prefer mechanical switches; typing on them feels (in my opinion) more comfortable and more consistent, and there are a wide variety of mechanical switches to choose from to get the feel and sound that suits your taste. I prefer tactile switches, named for the slight bump that can be felt as the switch is depressed, because they give me a physical indication of when the key press has registered.

An animation of the three common mechanical switch types in action. Image originally from SteelSeries.
How they work
Once people see that I have very few keys and no key legends, they often ask a logical question: how do you type? With only 34 keys, I employ a number of tricks to still be able to access all of the letters, numbers, symbols, and modifiers that I need. All of these tricks are possible because my keyboards run a customizable firmware; I can program the keyboard’s behavior to suit my needs.
The first and most useful trick is layers. I typically explain layers by referencing the shift key that all typists use. Normally, your keyboard is on a base layer, where all the keys do what their labels say. When you press shift, that behavior changes – letters become capitalized, numbers become symbols, and some symbols become other symbols. Modern laptops often have a function or fn key that provides another layer for things like media keys or the function row (F1, F2, etc.) as well.
My keyboard has four layers, shown below. The first is the base layer, which is active by default when no keys are pressed. The other three layers are activated by pressing the bold keys. While these bold key(s) are held down, the remaining keys change to type the letters/numbers/symbols shown in the corresponding layer. (Conversely, the blank key(s) on each layer are the key(s) that must be held to activate that layer.) For example, when I’m on the base layer (layer 1) and I hold the L2 key (under the K on my right hand), all the keys change to be symbols instead of letters (layer 2).
| left pinky finger | left ring finger | left middle finger | left index finger (and thumb) | left index finger (and thumb), inner column | thumb | thumb | right index finger (and thumb), inner column | right index finger (and thumb) | right middle finger | right ring finger | right pinky finger | |
|---|---|---|---|---|---|---|---|---|---|---|---|---|
| top row | W | F | P | G | J | L | U | Y | ||||
| middle row | A | R | S | T | D | H | N | E | I | O | ||
| bottom row | Q | X | C | V | B | K | M | ,+ | .@ | Z | ||
| below bottom row (thumb only) | esc | space | L3 | shift | L2 | back space |
| left pinky finger | left ring finger | left middle finger | left index finger (and thumb) | left index finger (and thumb), inner column | thumb | thumb | right index finger (and thumb), inner column | right index finger (and thumb) | right middle finger | right ring finger | right pinky finger | |
|---|---|---|---|---|---|---|---|---|---|---|---|---|
| top row | % | { | } | ^ | ~ | ? | = | * | ||||
| middle row | " | ' | ( | ) | $ | ` | - | _ | : | ; | ||
| bottom row | ! | # | [ | ] | & | | | / | < | > | \ | ||
| below bottom row (thumb only) | esc | space | L4 | shift | back space |
| left pinky finger | left ring finger | left middle finger | left index finger (and thumb) | left index finger (and thumb), inner column | thumb | thumb | right index finger (and thumb), inner column | right index finger (and thumb) | right middle finger | right ring finger | right pinky finger | |
|---|---|---|---|---|---|---|---|---|---|---|---|---|
| top row | page up | up | page down | G | J | 7 | 8 | 9 | ||||
| middle row | home | left | down | right | end | del | 0 | 1 | 2 | 3 | ||
| bottom row | Q | X | ctrl tab | alt tab | B | K | 4 | 5 | 6 | Z | ||
| below bottom row (thumb only) | esc | space | shift | L4 | back space |
| left pinky finger | left ring finger | left middle finger | left index finger (and thumb) | left index finger (and thumb), inner column | thumb | thumb | right index finger (and thumb), inner column | right index finger (and thumb) | right middle finger | right ring finger | right pinky finger | |
|---|---|---|---|---|---|---|---|---|---|---|---|---|
| top row | W | light down | light up | pause | J | F1 | F2 | F3 | F4 | |||
| middle row | A | mute | vol down | vol up | ins | print scrn | F5 | F6 | F7 | F8 | ||
| bottom row | Q | play/pause | prev track | next track | scrl lock | K | F9 | F10 | F11 | F12 | ||
| below bottom row (thumb only) | esc | space | shift | back space |
(Since I’ve described layers by referencing the shift key, I should clarify that I also have a shift key, which behaves much like it would on a normal keyboard, but I haven’t included the shifted layer in these layer diagrams. It’s mostly just capitalized letters, after all.)
You’ll notice that even the letters on my base layer look odd compared to a typical keyboard. In the United States, most keyboards use the QWERTY layout, named for the first 6 letters at the top left. My letters are arranged according to an alternate keyboard layout called Colemak, plus a few of my own custom tweaks. Colemak is intended to be more ergonomic by arranging letters in a way that makes sense according to how they typically occur in English words. For example, most of the vowels and other frequently pressed letters are right on the home row (where your fingers rest while idle).
| left pinky finger | left ring finger | left middle finger | left index finger | left index finger, inner column | right index finger, inner column | right index finger | right middle finger | right ring finger | right pinky finger | |
|---|---|---|---|---|---|---|---|---|---|---|
| top row | Q | W | E | R | T | Y | U | I | O | P |
| middle row | A | S | D | F | G | H | J | K | L | ;: |
| bottom row | Z | X | C | V | B | N | M | ,< | .> | /? |
| left pinky finger | left ring finger | left middle finger | left index finger | left index finger, inner column | right index finger, inner column | right index finger | right middle finger | right ring finger | right pinky finger | |
|---|---|---|---|---|---|---|---|---|---|---|
| top row | Q | W | F | P | G | J | L | U | Y | ;: |
| middle row | A | R | S | T | D | H | N | E | I | O |
| bottom row | Z | X | C | V | B | K | M | ,< | .> | /? |
Another trick that helps me get the most out of my small keyboards is combos. Combos use chording – pressing more than one key simultaneously – to simulate a separate key. For example, pressing c and v at the same time produces enter on my keyboards. Similarly, m and , produce tab. Those two combos are certainly my most frequently used ones, but I also use a variety of other combos to simplify sequences of keypresses that I repeat often. I’m a heavy Vim (a nerdy text editor) user, and I have combos for the frequently used <escape>:w<enter> and <escape>:q<enter> sequences that save a file and quit the editor, respectively. I also have a combo that causes the next character to be its modified Spanish version (e.g., the combo followed by a or n produces á or ñ, respectively) to aid in my occasional Spanish writing. Another combo, which I call caps word, is a smarter version of caps lock that automatically disables itself when I press space or otherwise end the word with a symbol or enter. (These more custom combos also illustrate the flexibility that using a customizable firmware provides!)
A special form of combos that I use are called combo mods, short for combo modifiers. If you looked carefully at my layer diagrams above, you may have noticed that the ctrl, alt, and super (known as cmd on Mac or windows on windows) keys are missing. I type these modifiers by using combos on my home row. These combos behave a bit differently than the other combos I’ve described in that these ones only trigger if the corresponding keys are pressed simultaneously and held down. Requiring that the keys be held down helps reduce the chance that I’ll accidentally trigger the combo when I really mean to quickly type the keys that make up the combo.
Why require press-and-hold for combos?
Combos are triggered based on a time threshold; if the keys in the combo are all pressed within the threshold, the combo fires rather than the individual keys. When typing quickly, and particularly with keys on the home row that are often pressed in rapid succession, it's possible to accidentally trigger a combo. One solution to this problem is to decrease the time threshold, but that has the downside of making it possible that, if your fingers aren't perfectly synchronized, you type the individual keys when you really meant to trigger the combo. Requiring a combo to be not only pressed but also held allows me to maintain a longer time threshold while also reducing the chance that I'll accidentally trigger the combo in normal typing.You can see the combo mods that I use below. All three modifiers are available on either hand. (The shift key is available as a normal key on my right thumb, by the way.) Each modifier uses a combination of the index finger and one of the other fingers on the same hand. I think of the index finger key as the “combo mod trigger key” and the other three keys as determining which modifier will be emitted. Using multiple of the non-index-finger keys allows me to hold multiple modifiers at once. For example, by pressing and holding t, s, and a simultaneously I can trigger ctrl + alt. I’ve found this setup to be great for my shortcut-heavy workflows; wrist contortions to reach modifier keys on a traditional keyboard are a common source of discomfort among typists.
N, E, I, and O keys as well. Note that the letter keys have to be pressed at the same time and held to trigger the modifiers.The last trick I use is adaptive keys. (Perhaps I should say adaptive key, singular, because I only have one currently.) Adaptive keys change the behavior of one key based on the key that was pressed before it. I use an adaptive key to accommodate a key sequence that I use frequently but that would otherwise be a bit unwieldy with my layered setup. The sequence is ./, commonly used for specifying file paths in code or on the command line. If you return to the layer diagrams above, you’ll note that the . key is in its usual place (compared to a standard QWERTY keyboard) on my right ring finger just below home row. But /, which is typically on the right pinky finger just next to ., is on my symbol layer on the right index finger key just below home row. Typing this sequence without an adaptive key feels uncomfortable – first press ., then hold down the thumb key to activate the symbol layer, then press /, then release the thumb key (because the next key is usually a normal letter). So I created an adaptive key instead. When I type . followed by , in quick succession, I get ./ rather than .,. (This isn’t a combo, though. I have a combo on the same two keys such that pressing . and , at the same time produces =>, another sequence commonly used in coding. See how there are so many possibilities with a customizable keyboard?)
Why?
The other question people tend to ask, after their eyes have glazed over from my brief explanation of layers and the like, is simply “why?” Why buy (or build) an expensive keyboard, customize it, and then basically relearn how to type? Why not just use a standard QWERTY keyboard like everyone else?
The common answer that I and many others like to give is ergonomics. By using fewer keys, and positioning them in a way that feels more natural, I avoid stretching and contorting my hands. It feels nice and hopefully reduces the chronic wrist pain that programmers and other heavy typists often experience.
Ergonomics is often just an excuse, though. While I do think that my setup is a bit more ergonomic than a standard keyboard, I also simply enjoy crafting and using a custom setup. I like being able to optimize my typing workflow when things feel inefficient or uncomfortable. It makes typing all day more fun and helps me have a more keyboard-driven workflow, which I enjoy. (I think my keyboard-driven workflow has had more ergonomic benefits than the actual key positioning for me; heavy mouse use makes my wrists hurt.) Relearning to type on a custom setup has also turned me into a great touch typist – there aren’t labels on my keys, after all.
So, at the end of the day, the real reason for all this keyboard complexity is that I enjoy it. I work in a typing-heavy profession. Why not have some nice, custom typing tools to make the job a bit more fun?
Notes and links
In the past, I’ve written about building my Kyria and its stand, and I’ve published a review of my Atreus.
You may be wondering why I only use two keys with each pinky. The answer is comfort. I found that I couldn’t reach the top pinky keys on my Atreus without twisting my hand. When I built my Kyria, I had hoped that its more aggressive column stagger would solve this problem for me, but I found that I still didn’t really like reaching that third pinky key. At that point I tweaked my layout to only use two keys on each pinky, and I’ve enjoyed it ever since.
By placing the Atreus on top of my laptop keyboard (and disabling the built-in keyboard), I’m able to use my custom setup even while on the go. I would not have been willing to depart from the normal QWERTY layout so drastically on these keyboards if I wasn’t able to use them all the time. (On the rare occasions when I have to use a normal keyboard I am a very slow typist!)
Many small keyboard enthusiasts prefer to access their modifiers using what’s called home row mods. The keys on the home row are configured to act as normal keys when pressed and released but to behave as modifiers (
shift,ctrl,super,alt) when held. I experimented with home row mods for quite a while – they are a bit more comfortable than my combo mods because they require holding only one key at a time – but could never get them set up right to avoid accidentally triggering modifiers when I meant to type letters and vice versa. I’ve written more about my decision to use combo mods on this site as well.I bought my Kyria kit from splitkb.com and my Atreus from Keyboardio. I’d highly recommend both vendors.
The “customizable firmware” I mentioned above, which allows me to program all sorts of neat behavior into my keyboard, is called QMK. It’s great.
An overview of my switches and key caps for the curious mechanical keyboard enthusiasts: My Kyria uses Boba U4T (62g) switches, which have a satisfyingly large tactile bump. My Atreuses use Kailh Box Brown and Kailh Box Silent Brown switches. (I think the normal Box Browns are my favorite of all three.) I’ve ordered switches from splitkb.com, Keyboardio, and NovelKeys with success. The keycaps on all my keyboards are Cherry profile PBT caps that I bought from KBDfans.